This starts with wanting some fancy grips for my handlebars. I really like the look of the Brooks plump handlebar grips, the problem is they are very expensive–about $150 plus tax if I were to get them locally. That would be more than my bike is worth and just wasn’t in the budget for a basic runabout.
So it was off to Google to see if I could do it yourself and make my own grips.
I found a good starting point at instructables.com, but that guy had used the leather off of some more chair he found in a dumpster. Frankly that was a little too cheap for me. All I could imagine what bedbugs would infest my bike.
Essentially the Brooks style grips are a series of leather washers that are stacked.This is a view of the nearly finished result and you can see how the pieces of leather are ‘stacked’ one on top of the other.
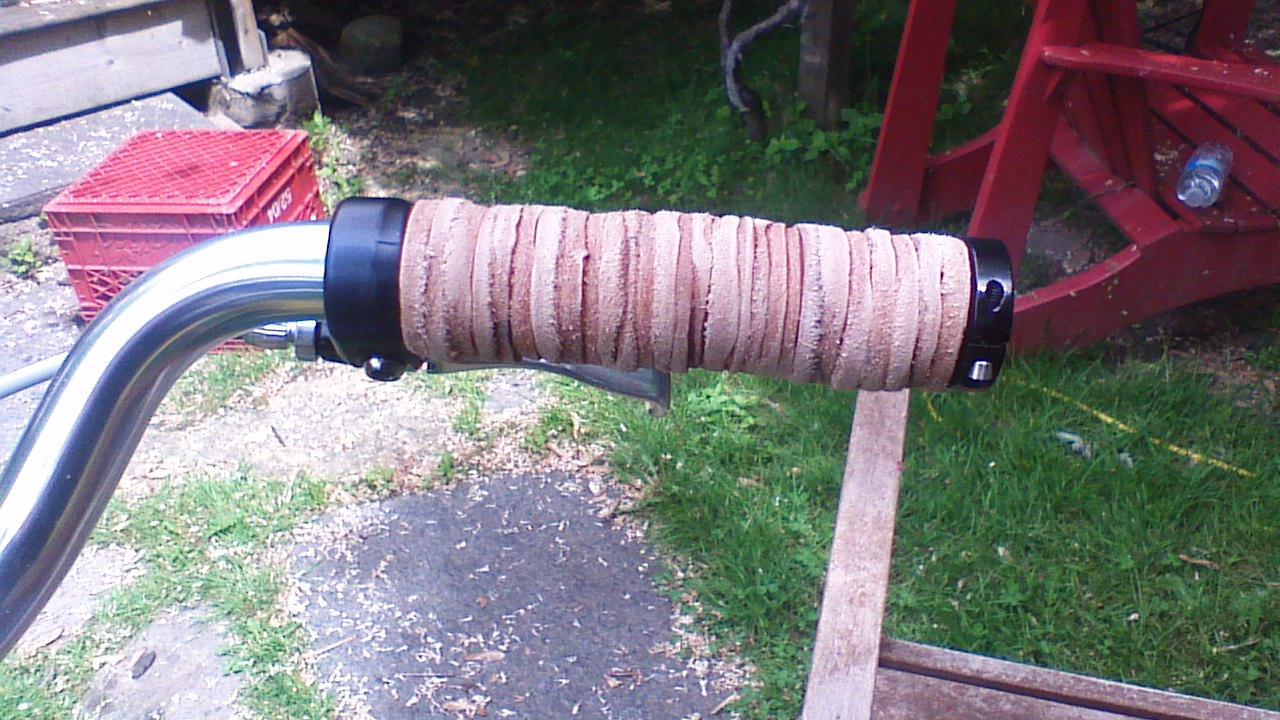
the (nearly) finished product
The interior hole needs to be the same diameter as the handlebar, the exterior needs to be around 30 mm or 1 1/4 inches.
So went on to Amazon and looked for leather, I didn’t find much that would ship to Canada I did find a place called Tandy leather and they had some smallish pieces on sale. I ended up getting a half shoulder that was 6 ounces of weight for a total 0f $25 plus shipping.. That’s pretty thick leather, around a quarter of an inch. On Amazon I was able to find a set of hole punches they aren’t the best quality but they’re not bad. They did require some sharpening before use. The key deciding factor in picking this particular set was a punch sized at 20 mm and one at 32 mm.
I figured out I would need 80 leather pieces for the grips. (12 cm long grips area dived by 3mm per disc = 40) Like any good accountant I built up a spreadsheet figure this out that spreadsheet is not attached.
The leather I got was very thick it made punching a hole 32 mm in diameter quite difficult. When I ended up doing is soaking the leather so it was softer and easier to punch. As this bikes sits outside all day getting the leather wet wasn’t going to be a problem.
I start off by punching out the 32 mm diameter discs, that left me with a piece of leather that looked like this. 
Once I had enough desks I went back and punched the 20 mm hole. My punch that had a centering piece which allowed me to make sure the two circles were concentric. Afterwards I realized that that center tended to shift that make the discs somewhat uneven. It wasn’t that big of a deal though perfection wasn’t the goal.
My handlebars are 22 mm in diameter, with the with the 20 mm hole that left a slight interference fit but leather is stretchy so it works well. Keep the leather disks in place the butt up against the brake lever assembly at one end and at the bar and itself I’ve been some cheap lock on bike grips parts. Down the road I may polish them to be just aluminum instead of black.

To protect the top tube I’ve added a sewn leather sleeve.

I’ve also used some scraps on my bike rack to hook on bungee cords, protect the edge from straps and fasten on the rear lights.

The leather piece I got was 7 ft.² and the grips part of the project only used one and a half square feet so I have lots of leather left over. In non-bike projects I made a leather valet tray and I still have another 4 ft.² leftover.
If I was to do it again I would probably buy thinner leather, the stuff I got was very thick and made punching the holes quite difficult. Buying some 4 ounce leather would probably make things just a little bit easier and probably help with the holes being more concentric.
